Halloween Party: A Designer’s Real-World Embroidery Review
First Impressions: Playful, Not Precious
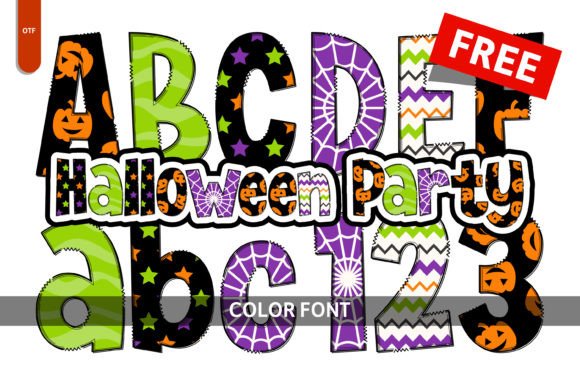
When I opened Halloween Party for the first time, I didn’t see “spooky” — I saw *inviting*. It’s got that warm, hand-drawn energy you’d expect in a children’s book cover or a boutique bakery’s seasonal banner. The letterforms lean slightly, curves are generous but controlled, and there’s just enough irregularity to feel handmade — not sloppy. As a designer who’s stitched hundreds of font-based projects, I immediately pictured it on a soft cotton tote bag for a local preschool’s fall fair: cheerful, legible at 3", and unmistakably *Halloween* without leaning into cliché bats or dripping blood.
Where It Shines (and Where It Doesn’t)
Halloween Party works best where personality matters more than precision. Think sweatshirt embroidery for a mom-and-pop café’s October staff shirts, baby onesies with “BOO!” in playful script, or pillow covers for a nursery’s seasonal rotation. Its open spacing and moderate stroke weight translate well to fill stitch and satin stitch — no tiny serifs to vanish under thread, no cramped counters that trap lint or distort on stretchy fabric.
It’s also surprisingly versatile across product types. I tested a scaled-down version on a tea towel hem (using light tear-away stabilizer) and it held clarity even after three rounds of hot washes. On a twill apron? Clean, friendly, and professional enough for a small-batch baking studio’s branding. As an embroidered patch for denim jackets? Yes — the design’s rhythm gives it presence without overwhelming the garment.
But let’s be real: Halloween Party isn’t built for micro-detail work. Don’t push it below 2" tall on lightweight knit t-shirts — the curves soften too much, and thread tension can blur the charm. Avoid it on highly textured fabrics like bouclé or thick terry cloth unless you’re willing to double-stabilize and reduce stitch density manually. And skip curved surfaces like cap fronts unless you’re using a frame system that minimizes fabric distortion — those gentle swells in the letters don’t forgive stretching.
What Your Customers Will Actually Notice
Your buyers won’t read the file specs — they’ll feel the vibe. When someone sees Halloween Party stitched on a personalized gift, they register warmth, approachability, and intention. That matters. A holiday-themed embroidered tote from your Etsy shop doesn’t just hold groceries — it signals care, craft, and seasonal joy. That emotional resonance lifts perceived value. I’ve watched customers choose a $48 sweatshirt over a $36 one *solely* because the font felt more “them.” Halloween Party delivers that quietly confident tone.
It also supports brand consistency without demanding rigid repetition. You can pair it with simple geometric icons (a pumpkin, a ghost outline) or use it solo — it holds its own. For small shop owners building a cohesive holiday collection, that flexibility saves hours. No need to over-design around the type; it’s already got voice.
Stitching Clarity ≠ Visual Simplicity
Don’t mistake its friendly appearance for low technical demand. Halloween Party relies on balanced stitch density — too dense, and it puffs up on soft fabrics; too sparse, and the playful flow collapses into disconnected segments. I recommend checking the fill stitch transitions between curves and straight strokes on scrap fabric first. Watch how the corners behave: do they feather cleanly, or does thread bunch? That tells you whether your machine needs a slight tension tweak or if the design benefits from a light cutaway stabilizer underneath.
Practical Notes Every Embroiderer Should Run Through
- Always test on scrap fabric — especially if you’re using it on baby items or garments meant for frequent washing.
- Check thread color contrast carefully. This font’s charm lives in its shape, not shadow or outline — so pale yellow on cream fabric may disappear entirely.
- Review stitch density before hooping. If your machine struggles with dense fills, consider simplifying background elements or adjusting underlay settings.
- Confirm hoop size compatibility. While Halloween Party scales well, avoid cramming the full phrase into a 4" x 4" hoop if letter spacing tightens unnaturally.
- Inspect small details at actual stitch-out size. Zoom in on the mockup — does the “g” tail lift cleanly? Does the “a” counter stay open?
- Test black-and-white mockups. If it reads clearly without color, you’ve got strong visual hierarchy — critical for digital embroidery files sold to other makers.
- Compare light and dark fabric backgrounds. Some playful fonts lose definition on deep charcoal or navy — Halloween Party holds up better than most, but still verify.
- Use proper stabilizer for your fabric type. Light tear-away for stable cottons, cutaway for knits, and medium-weight fusible for nap-free linens.
- Confirm licensing terms before selling finished products or digital embroidery files. Since Halloween Party falls under Color Fonts, check whether commercial use is included — many designers assume “fonts” = unlimited use, but embroidery-specific licenses vary.
Final Thought: A Tool With Temperament
Halloween Party isn’t a neutral utility font — it’s a collaborator. It brings mood, rhythm, and seasonal sincerity to your embroidery project. Used thoughtfully, it elevates a simple tote bag into a keepsake, turns a baby onesie into a cherished milestone marker, and gives your craft business a distinct, memorable voice during a crowded holiday season. But like any strong personality, it asks for thoughtful pairing and realistic expectations. Respect its scale, honor its texture, and test it like you mean to sell it — because when you do, your customers will feel the difference in every stitch.